It's beginning to look like Christmas around my house finally. I remember all the excitement just a few short years ago when I drug the boxes of Christmas stuff out....! Not much excitement now that my two children are 21 and 18. Oh how I wish for the sweet little faces to come running down the stairs and start digging through the bins and boxes of decorations. It has taken me two days to get all the stuff put up and finally decorated the tree all by myself. It was bitter sweet hanging each ornament and remembering when they made it for me and how old they were. My favorites are the ones they have their pictures on, the puzzle ornament, the CD ornament, the reindeer hand print and on and on! They are all so precious and like I said it was bitter sweet because they were not here to join in!
Well, this year I plan on starting a new tradition ....the Santa Key! I found the cute idea on Pinterest, which is my new addiction. The cute graphics for the Santa Key poem can be found here with all the instructions. I found my keys for $1 at Michaels and the download was free and I have the paper so it's a really quick and easy gift. I plan on making several and taking them to friends who have little ones. Maybe I can start a tradition for their family.
Everybody needs a Santa Key...I just might keep one for myself ;)
Friday, December 2, 2011
Tuesday, November 22, 2011
Amazing site...WORDLE!
It's been a while since my last post...LIFE HAPPENS!
Not much creating going on these last few weeks...PINTEREST has consumed my life these days. Funny how I can sit for hours and feel so creative and I haven't left my computer!
Today I stumbled on to something amazing...maybe you have heard about it and I have been out of the loop but Wordle is amazing. I always wondered how I could do the cool word combinations to get the look of subway art without having brain freeze trying to figure it all out. This is the perfect site to help with all your word projects! I made my first "Wordle" today and it's easy and fun...go give it a try!
I will be sitting in the Dallas Cowboys Stadium watching my daughter cheer as a DCC on Thanksgiving Day! She's "Living the Life" like we call it around here and we get to join in on the fun!
Wishing everyone a wonderful Thanksgiving!
Saturday, October 1, 2011
Craftroom MAKEOVER
Who wouldn't like to have a blank canvas when you start a project! The upstairs dance room got a makeover recently. My daughter is the dancer in the family and this was her special room. It has served it's purpose but now that she is off at college and being a Dallas Cowboys Cheerleader I decided it was time to transform it into my special craftroom.
The pink walls and ceiling are not my favorite color but I didn't have the patience to repaint...let dry....then move in...I just moved in and will add my favorite RED to the mix along with turqouise, my second favorite color.
The room is taking shape, still needs some organizing...but will do for now. I have made several things in there already and WOW it was so nice to have all the extra room. I have been cramped up in a spare bedroom with all the leftover stuff everyone decides they don't want in their space! I never realized I had so many supplies, great having the space to spread out. I plan on getting some serious crafting done in this new space of mine....NO EXCUSES!
I will share more pics later after the final transformation...Happy Crafting!
Tuesday, August 2, 2011
Proud MOM of a Dallas Cowboys Cheerleader!
WOW...my daughter Amelia made the final cut last night to become one of the 17 Rookies on the Dallas Cowboy Cheerleaders! They will have 17 vets and 17 rookies. It's been a long process, starting in May with about 450+ girls showing up for the 1st round of auditions. The next cut came in around 231 and the next weekend they had to add talent and interview. The pool of girls was narrowed to 51...and then 27 went to training camp. They reported to the training center each night and in 10 weeks learned about 12 dances!
My daughter was previously a Kilgore Rangerette so she was very accustomed to working hard and learning things very quickly...thank goodness! The directors have made cuts each week and last night they let the 34 girls know they were the new squad! Very exciting for her as well as our family! I can't wait to watch her perform, I will be beaming with pride! The tryout process has been documented by CMT and will be aired in Oct. 2011 sometime...The Making of the Team! I can finally be that fly on the wall and see what went on all these months! I am one proud MOM of a DCC!
My daughter was previously a Kilgore Rangerette so she was very accustomed to working hard and learning things very quickly...thank goodness! The directors have made cuts each week and last night they let the 34 girls know they were the new squad! Very exciting for her as well as our family! I can't wait to watch her perform, I will be beaming with pride! The tryout process has been documented by CMT and will be aired in Oct. 2011 sometime...The Making of the Team! I can finally be that fly on the wall and see what went on all these months! I am one proud MOM of a DCC!
Wednesday, July 27, 2011
Goodwill transformation!
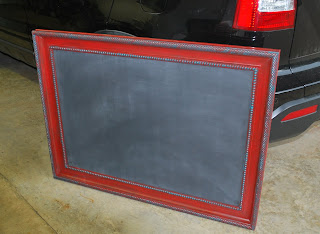
I admit...I drop by a Goodwill almost every other day! It's right on my way to town and I just can't help myself! I imagine there is a treasure just waiting for me...and the day I found this frame for $14.99 ...I knew I found it! I wanted to make something with a big impact for my daughter's new apartment and this was the treasure......PURE JOY! (simple pleasures)
It didn't look like much in the beginning but I knew it could be transformed...!
I started off by giving it a good sanding and painted it RED...my favorite color! After letting it dry, I lightly sanded it again along the molding. I painted the molding with a turquoise wash (mix a little water with your paint to make the wash) and gently wiped the excess paint away with a dry cloth. I loved the results but it needed more color so I sanded the molding again and repeated the turquoise wash.
After it was dry I sprayed a light coat of polyurethane to help protect the finish.
Now to the inside...I used the original foam backed picture that was in the frame, sanded it a little and gave it a couple of coats of chalkboard paint. I inserted it back into the frame and it was that simple...!!!
Gotta go for now...off to GOODWILL to find my next treasure!!!
Linking to
Tip Junkie's Tip Me Tuesday

Thrifty Thursday Week 34!

It didn't look like much in the beginning but I knew it could be transformed...!
I started off by giving it a good sanding and painted it RED...my favorite color! After letting it dry, I lightly sanded it again along the molding. I painted the molding with a turquoise wash (mix a little water with your paint to make the wash) and gently wiped the excess paint away with a dry cloth. I loved the results but it needed more color so I sanded the molding again and repeated the turquoise wash.
After it was dry I sprayed a light coat of polyurethane to help protect the finish.
Now to the inside...I used the original foam backed picture that was in the frame, sanded it a little and gave it a couple of coats of chalkboard paint. I inserted it back into the frame and it was that simple...!!!
Gotta go for now...off to GOODWILL to find my next treasure!!!
Linking to
Tip Junkie's Tip Me Tuesday

Thrifty Thursday Week 34!

Friday, July 15, 2011
Turquoise Love!
Little tables = love for me! I have had this little beauty for a long time but didn't know quite what to do to it until now. My daughter will be moving into her own apartment and her THEME color is turquoise! I finally knew just I wanted to do...now to make it happen was another thing!
I started off by sanding the whole table and wiping it down with a clean cloth. I put some of the turquoise paint in a tray and added a little water to make it more like a wash. I started wiping the wash on the back (just in case I didn't like it) and when I LOVED it I began wiping it all over in the direction of the woodgrain. As quickly as I wiped it on...I wiped it off with a dry rag. I found I had to work fast because it dried to dark. After it dried I wiped on a small amount of brown antiquing glaze all over and wiped the excess off.
I love the finished product...it turned out just like I imagined! Now all it needs is a cute knob and it's ready to find it's new home in my daughter's new HOME....!
Oops...forgot to put the drawer back for the pic...Oh well...you get the idea...! The top has a piece of glass that fits on the top so the paint won't get messed up, even better!
Linking to Redoux!
Wednesday, July 13, 2011
Backsac!
I love it when I have an excuse to make baby things! My children are 20 and 18 so it's been a long time since I have sewn for my own..they don't appreciate HOMEMADE at this age! I have a friend who is expecting soon and this was my shower gift to her and her soon to arrive Hadleigh Anne, a BACK SAC! This is my own creation...I combined the idea of a backpack and a tote and this is what I came up with. It will be a bag she can throw a few of those necessary baby things in and head out the door and look cute at the same time. When she grows up it can be her dance sac or a slumber sac!
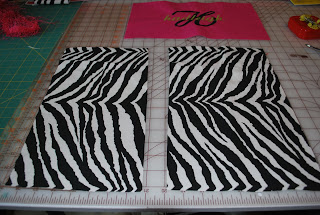
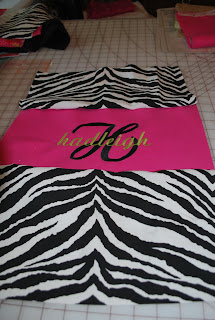
I then cut 2 pieces the same width of the pink to attach to the top and bottom to form the front of the sac.
Pin the pieces together and stitch.
The 3 pieces are attached and this is the front of the Backsac.
I added some fancy trim at this time where the pieces were attached...any trim could be added at this time or leave it plain...your choice!
I just love this fancy trim but boy is it a mess to work with...be careful sewing, it wants to grab your needle and hang it up...go SLOW!
You are now ready to cut your pieces for the lining...I cut mine a few inches bigger than the sac front and back ...you will understand what I did in a minute!
This is the back piece of the sac...cut the same size as the front piece.
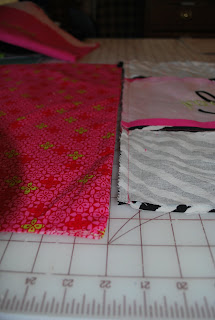
Pin and sew front to back on 3 sides leaving top open ( I inserted the 2 inch cording loops for the backsac cording at this time on the sac ...picture below) and do the same for the lining except leave a 2 inch opening on the bottom edge in order to turn later.
This is at the bottom of the front and back piece of the backsac ...insert loop to the right side with the raw edges hanging out of the wrong side...I burnt the edges so they would not ravel (This is nylon cording, any type ribbon or cording could be used)
As you can see the lining is longer than the backsac itself...this allows the top of the lining to entend outside and makes a band at the top of the finished sac.
This view shows the length difference better....
With front and back sides turned to the wrong side...insert the lining which is right side out and attach the tops in order to form the sac...turn the entire bag through the opening you left in the bottom of the sac lining.
This is what it will look like after you have turned the sac...press all seams flat.
Insert lining into bag and now you see why the lining was made longer...it creates a nice neat band of color at the top of the bag!
Cut 2 pieces of trim color about 1 inch longer than the finished bag width and about 3 inches wide, turn the edges to finish the width of the bag.
Sew these pieces together to form tube and turn....( I use a long paint brush...works great)!
Attach these to the front and back about 3 inches from top....the cording will be threaded through these later.
The cording is now threaded through the attached tubes and looped through the bottom loop of the sac in order for the sac to be opened and closed like a drawstring.
Knot the ends once the length is determined and burn the edges so they will not fray.
The top and bottom are now attached....you now have a BACKSAC!
I also made a small envelope style bag for a pac of wet ones to fit in....I didn't take pics of the process but it is pretty simple. I will write a post on that process at a later date!
The last gift was a burp cloth made from a diaper. I simply pieced several pieces of fabric, added my trim, attached this piece to the front of the cloth diaper. I then cut a back piece the size of the diaper and sewed right sides together leaving a small opening in order to turn, stitch the opening closed. I also sewed the front to the back along the diaper lines on front in order to hold the two pieces together.
Hadleigh is all set....she now has her own BACKSAC.....!
Subscribe to:
Posts (Atom)


