Saturday, February 8, 2014

Dino Backsac!

A special little boy had a birthday this week and his gift was a backsac painted especially for him.  He is 3 years old and what little boy doesn't like dinosaurs.  I painted this same dinosaur on a t-shirt for my son 17 years ago.  You might be wondering  what the dinosaur is holding....a cassette player!  My son is 20, guess that tells you I never throw anything away....NEVER!

I made the bag similar to this mustache backsac except I painted the dinosaur on a piece of fabric and pieced it into the front of the bag.  I love making these bags because they are so simple and you can change it up depending on the person you are making it for.
 I transferred my dino pattern onto a piece of orange fabric.
I used plain acrylic paints with textile medium added to make it permanent.
 This is the finished painted piece.
 I stitched two rows of trim under his feet.
                                             This is the finished bag for the Birthday Boy!
You can refer to  this backsac tutorial for details on bag construction.
After filling it with dinosaur books, colors and a few extra goodies he's all set!
Happy 3rd Birthday Joe!

Thursday, February 6, 2014

Birds of a Feather Flock Together!

My sister Sheri turns 60 on February 7....!  She had a special Bday gift request from me this year.  Her request involved one of her favorite things.....BIRDS!  She found a picture of birds on a wire here and asked me to make something using this!  Not much to go on but I knew it had to be bright and colorful with lots of her favorite colors, especially ORANGE!

I started off painting the 12 x 12 canvas with Gesso to build up some texture.  I mixed mat gel with my orange paint and painted the entire canvas, let it dry and painted it several more times adding a little white to the top to lighten it up.

I cut each bird piece from the original copy and traced them onto scrapbook paper.  Deciding on which paper pieces to use was the hardest part of the whole project!  After cutting each piece I started laying them out on the canvas.  I used the mat gel as my glue and glued the pieces overlapping to add dimension. After the bird pieces were glued down I cut a piece of black twine and laid it underneath the birds and glued it in place and let everything dry. After the twine was dry I punched brown circles out, cut them in half and laid each half over the wire.  I pinched the pieces with my tweezers to fold over the twine.....instant bird feet!

Using my brush tip markers I shaded around each bird piece as well as the twine.  I used a blender pen to pull the color out to add a shadow.  I added some shading to the tops of the birds as well.   I added a few highlights with my white gel pen.  After everything dried, I added some dimensional shine to several places on the birds head feathers and tail feathers.


My sis loved her gift made especially for her!  
I wouldn't know what to do without my best friend! 
She's not a big fan of pics so I'm lucky she let me snap this!  
Love ya Sister and Happy 60th Birthday
and MANY MANY MORE!

Linked to Made by you Monday at Skip to my Lou


Linked to Make it and Love it

Saturday, February 1, 2014

HEART T-Shirt

FEBRUARY = RED + HEARTS!

I found this cute idea on http://wobisobi.blogspot.com for the altered t-shirt and thought I would give it a try.
I tried it on two different style t-shirts and both turned out really cute.   The instructions on the blog were super easy to follow.

I used a Ladies Hanes long sleeve t-shirt  on the first shirt.  The second shirt made from a Men's Hanes T seemed to cut better and was easier to sew.  The original tutorial suggested the Men's Hanes but I thought I would try both.  She was right...!  I followed her directions on both projects.

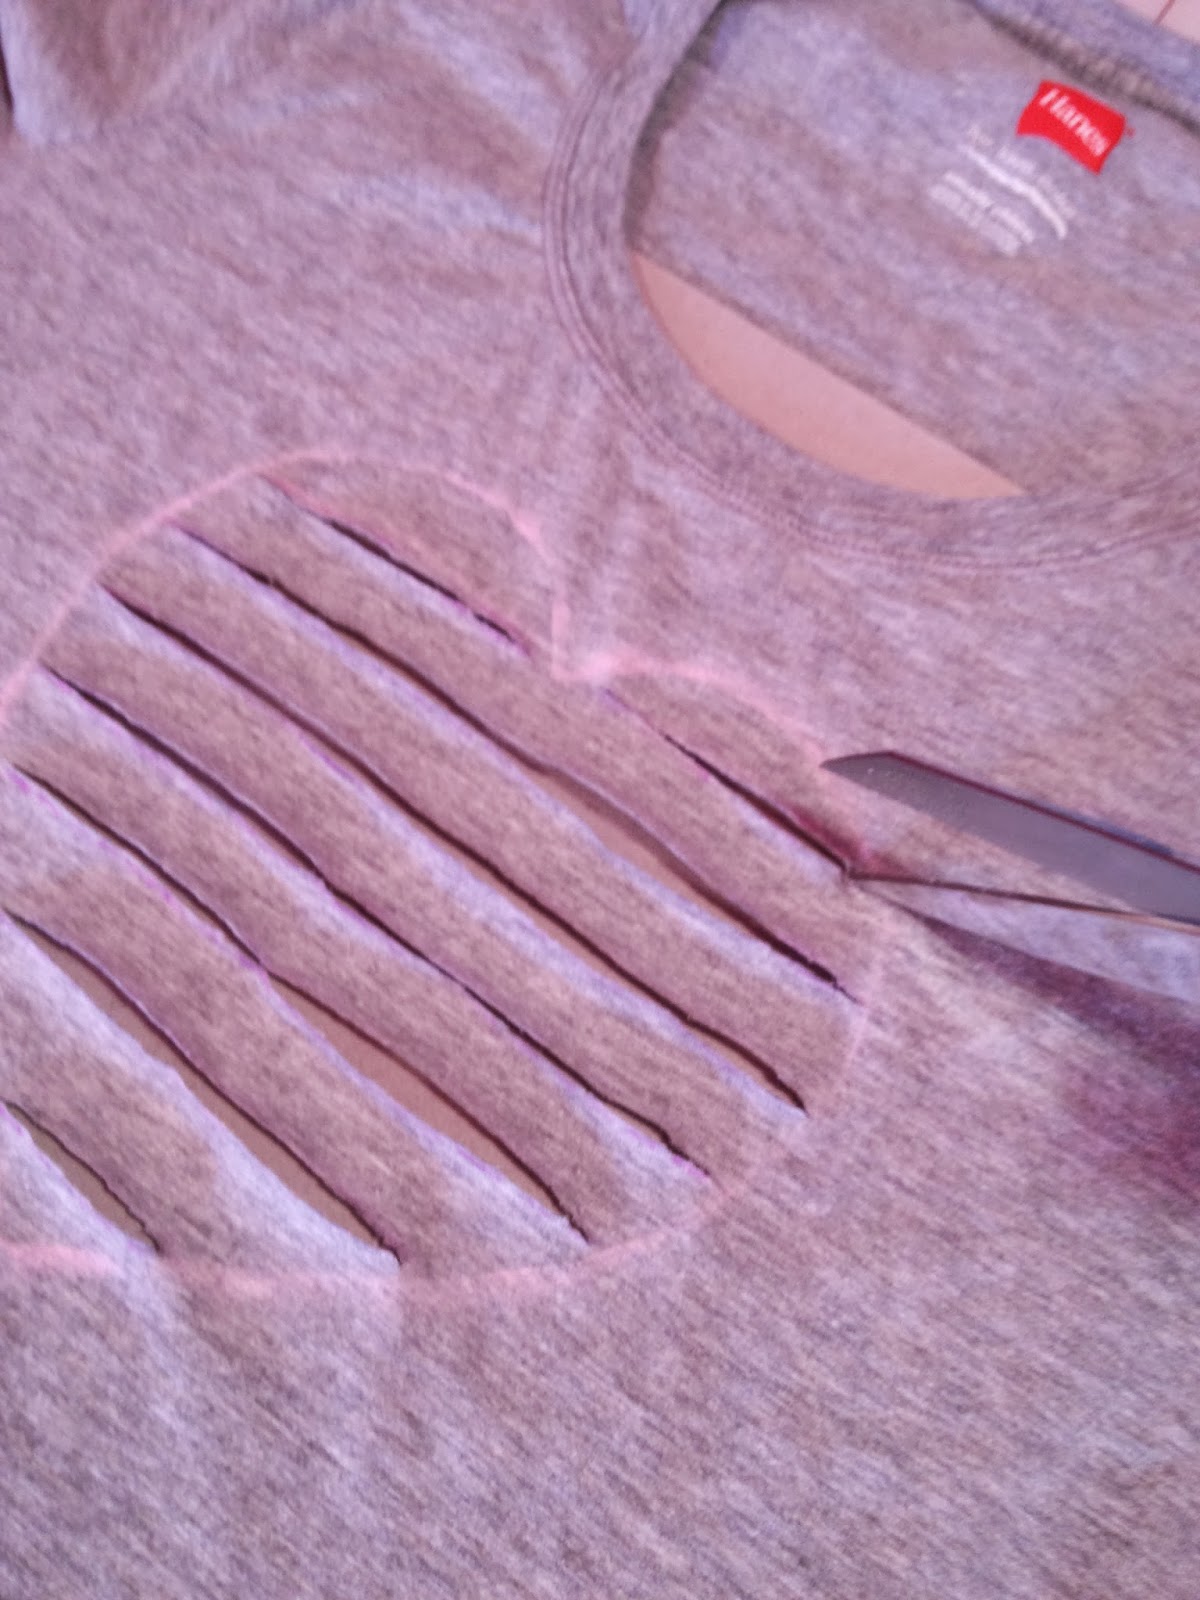
 I traced a heart on paper, cut and traced the shaped onto my shirt with chalk
 The lines are 3/4 inch apart.....mark with chalk.
 CAREFULLY cut along your marked lines.
 I put a piece of cardboard inside so I wouldn't cut through both layers by mistake!
 I used a piece of red knit from a skirt I purchased for $2...SCORE!
Cut a piece big enough to cover the heart area on the shirt front.
I had enough to do both shirts and enough for several more.
 Turn T inside out, put the cardboard back inside the shirt.
 Pin the contrasting fabric over the heart area.
 Turn T right side out and stitch around the outside of the heart shape.
 Pin between the slips and stitch on each solid piece from 
side to side of the heart shape.
 Turn to wrong side and cut away the extra fabric close to your heart.
 All finished and ready to wear!
I repeated the same process with the Men's T.
I cut the neck in a circle on the Men's T 
like the original tutorial suggested.


I love the way they turned out!
CUTE...QUICK...EASY...
3 of my favorite things when doing a project!
Related Posts Plugin for WordPress, Blogger...